Do you know as a blacksmith, you can save a lot of cost by forging your tools? Anvil is one of the essential tools in the blacksmithing process. Read on to find out how to forge an anvil.
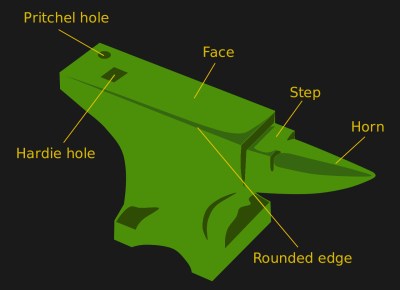
You would hardly find a blacksmithing project that wouldn’t involve the use of an anvil. It is arguably the most useful tool in the blacksmithing shop. It is also one of the largest tools with a smooth, leveled surface.
An anvil looks more like a block of forged iron. The rectangular flat surface and medium height make it suitable for most blacksmithing processes. Learning how to form a tool as important as an anvil is an excellent addition to any blacksmith’s skill bank.
Here are some practical steps on how to forge an anvil.
Instructions on How to forge an Anvil
Step 1: Get Your Tools and Materials
Getting your tools and materials is the first step in any blacksmithing process. The most challenging part of this step is getting the plate for the anvil top. The plate should be strong enough to provide resistance for your repeated hammering.
The other tools and materials are regular blacksmithing properties.
Step 2: Design Your Anvil
Different anvils have specific designs. However, having a draft for your anvil will make the process a lot easier. It will help you through the right materials to use and the sequence of steps to follow.
Note:
The design of an anvil is not rigid. You can create it any way you want when you want to forge an anvil. You can even make a cardboard model to simulate the anvil you intend to create.
The best part of having a cardboard model is that it will guide you through cutting the pieces. You would only have to cut the metal the same way you cut the cardboard.
Step 3: Cut The Pieces
This is one of the most straightforward processes for most blacksmiths. It would be easy for expert blacksmiths. However, beginners can also get it with ease.
What you want to do here is to cut out each part of the anvil. Your design and simulation model would make this more comfortable for you. Also, you have to carry out the cutting in precise measurements.
Step 4: Welding
The welding process of an anvil is tedious but straightforward. You have to do a lot of welding in joining the individual parts that you already cut out. You might have to join these parts together in a similar manner with your model.
Pro Tip
Don’t forget that you must include heavy-duty legs. These legs must be strong enough to withstand the substantial function of an anvil. Likewise, ensuring a proper weld is essential because it must be strong enough to suit its functionality.
Step 5: Filling
This step is slightly different from the regular blacksmithing steps that you are used to. Due to the structure of an anvil, you expect some spaces to be within the structure after completing your weld while forging an anvil. These spaces will undoubtedly reduce its effectiveness for its functionality; thus, you have to fill it up.
Be aware that you would most likely not be able to move your anvil once you fill it. Therefore, you should fill the anvil close to its permanent site.
Quick Steps
- Prepare a suitable mixture of concrete. The concrete should be large enough to fill the entire space within the anvil.
- Flip the anvil upside down and fill with the concrete.
- Shake together until you have a uniform distribution of concrete all through the entire space.
- Wait for the concrete to dry up before rolling the anvil to the area.

Step 6: Grinding
You can make use of an angular grinder to work on your anvil. It will help you achieve a smooth and perfect edge.

Step 7: Finishing
Now, it is time to improve the overall outlook of your anvil. It is possible to have some concrete stains and welding slag around the body of your anvil. Do a simple clean-up for the anvil.
You can polish your anvil or spray-paint it to make it much more appealing.
FAQs on How to forge an Anvil
Question
Can you form an anvil from scrap metals?
One of the primary features of a good blacksmith is the ability to build something useful from scraps. The case of an anvil is not entirely different. You can create almost the whole part of an anvil from scrap materials.
The only challenging part of an anvil is the plate on top. You might have to purchase one if you don’t have a suitable one. You should bear in mind that the plate must be fit for the power functionality of an anvil.
Question
What are the uses of an anvil?
An anvil is arguably the most useful tool in the blacksmith’s workshop. The primary use of an anvil is to carry out almost all forms of hammering. It also provides a suitable surface for some other procedures.
The properties of an anvil will make allow it to withstand high temperature and repeated blows from hammering.
Question
What can I use in place of an anvil?
If you don’t have an anvil and don’t have any means to get or make one, you can source it for an alternative. You can use massive solid steel with a flat and smooth surface. However, you should be aware that these alternatives might not be as suitable as an anvil itself.
Video
Precautions
Taking adequate precautions is one of the visible signs of professionalism. Certain precautions must be taken while forging an anvil. These precautions include;
- Ensure that your welding is done correctly.
- Ensure that you carry out the cutting with precise measurement.
- Be sure you have adequately done your welding process before filling.
- Use your gloves and other protective gear all through the entire process.