Introduction
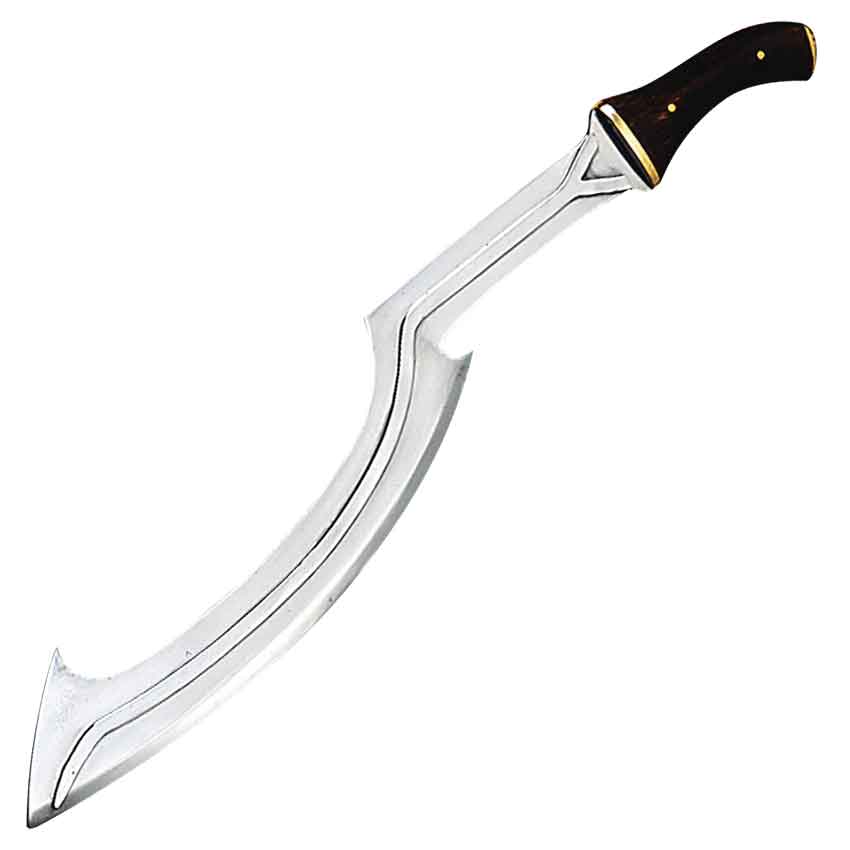
The Egyptian Khopesh sword is one of the weapons that made it out from the bronze age. This Egyptian weapon is a sickle-shaped sword used by the new kingdom of Egypt. A typical Khopesh sword is usually between 20 to 24 inches, making it one of the shortest ancient swords.
This sickle sword originated from the battle-ax when the ancient new kingdom of Egypt needed a more sophisticated weapon. The Egyptian Khopesh sword helps trap and pull out an opponent’s arm or pulling off an opponent’s shield.
Interestingly, this Egyptian weapon made it through the bronze age, and many blacksmiths still make the sword today. If you are curious about forging a weapon from the bronze age, here is a worthy option. Aside from improving your versatility as a blacksmith, it is also an excellent way to create a valuable weapon for yourself.
Are you interested in creating a DIY Egyptian Khopesh sword? The steps below offer an easy guide to help you make a great DIY Khopesh sword. Let’s explore.
Essentials
Like every other DIY process, the first step of producing an Egyptian Khopesh sword is to figure out the essential materials you would need for the procedure. Having the essentials on the ground ease the hassle of the process and makes the project realistic.
The essentials for making a DIY Khopesh sword include;
- Forge
- Hammer
- Anvil
- Quenching Oil
- Angle grinder
- Drill press
- Sander
- Clamps
- Spring steel or Bronze
- Wood for handle
- Polyurethane
- wood glue
- Epoxy
- Bandsaw
- Drawing materials
Instructions
STEP 1: Gather Your Materials
The first step to successfully forge your own DIY Egyptian khopesh sword is to gather your materials. Forging the Egyptian khopesh sword can be a bit more stressful than you think. You need every necessary material to get this job done.
Having these materials available will also enhance the process of making your Egyptian khopesh sword. These materials are essential for your Egyptian khopesh sword making. These materials should include the tools needed for forging the blade, the raw materials required in making the sword, and safety gear to keep you safe throughout the process.
STEP 2: Flatten the Steel
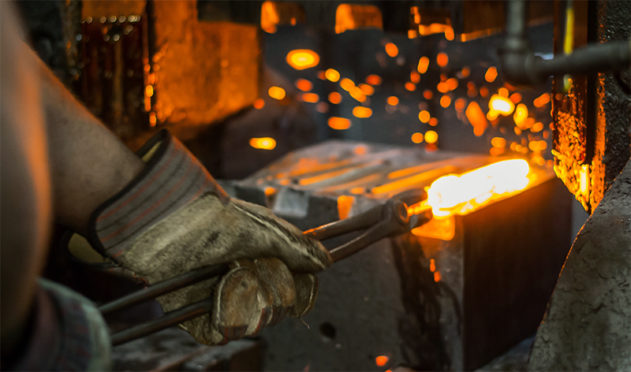
Swords don’t come in springs or curls, so you need to straighten and flatten the steel. To flatten the steel, you will need to heat it to make the process easier. Put the spring steel or bronze into the forge and tune up the heat.
Keep heating the metal until it becomes red hot. It is easier to shapen or flatten a hot metal than a cold one, which is why you need to make the steel hot before flattening. Please remove the metal from the forge and place it on your anvil when the metal becomes red shot.
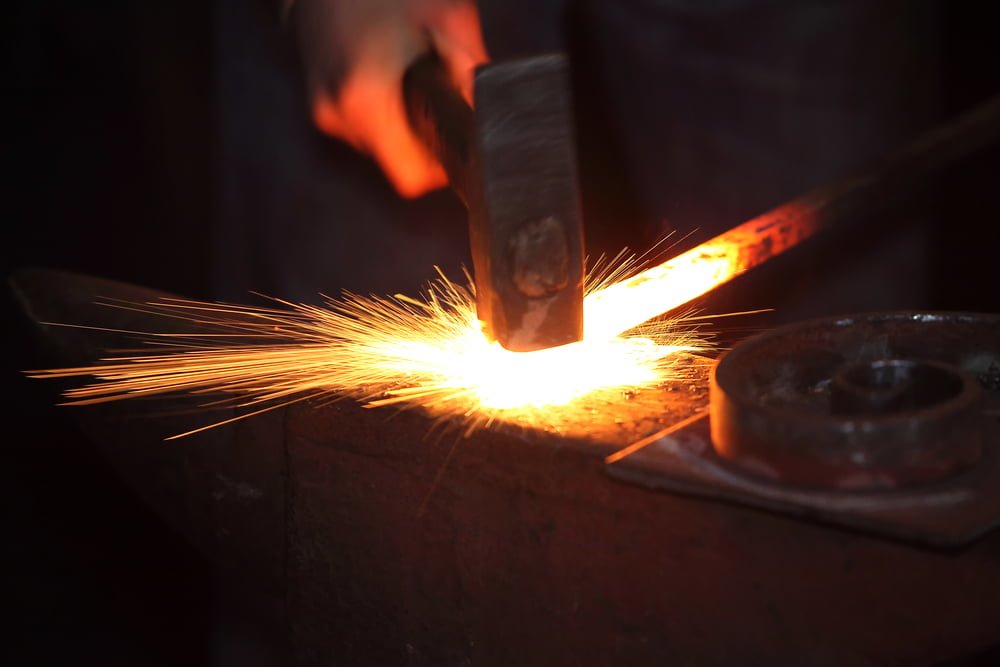
Hit the hot steel with your hammer to flatten it. Continuous blows of a hammer on the spring steel will bring it to a flattened shape. The flattened steel will form the blade part of the sword. After flattening the steel, please wait for it to cool before carrying out the net step.
STEP 3: Sketch Your Outline
Sketching your outline is very necessary when forging your Egyptian khopesh sword. Outlining the blade and handle of the sword will guide you when developing it. Outlining only needs you to get a drawing material and sketch the shape of the blade and handle on the steel.
Get the shape of the sword and sketch it down on the steel. You have to be careful when sketching, as your blade will take after any form of your sketch. The length and size of your sword depending on the drawing. The more extensive and more prolonged the sketch, the larger your khopesh sword.
It is best to pay attention to the dimension of your drawings. Making an accurate dimension from the sketch will make it easy to cut out your steel. It will also help you to have a foreknowledge of your final results.
STEP 4: Cut Out the Sketched Outline
You will need to use your bandsaw to help cut out the shape of your khopesh sword blade. It would be best if you cut out your sketched outline from flattened steel or bronze. Place the steel or bronze plate under the bandsaw and cut it according to the design.
Cut out the curves and bends of the blade with the bandsaw. Cut it carefully to avoid mistakes or disruption of the shape. It is vital to ensure that the cutting dimension follows your initial measurement. However, don’t be poised to have a perfect cut, as long as you are not disrupting the shape or pre-planned measurement.
STEP 5: Grind the Blade
Now, you have a rough shape of your Egyptian khopesh sword, but you need to make it more satisfactory. You have to grind the blade and edges of your sword with a grinder. Place the blade on your anvil while you work your angle grinder on it.
Grind the blade to make it smooth and more refined. You will also need to form the blade’s sharp edge by using the angle grinder to grind the blade’s edge. This process helps you to sharpen the edge and distinguish the blade from the grip.
You only have to sharpen the curved end of the blade while you leave the other lot for the handle. the sharpened length is the blade and the remainder will form your handle. It is best to note that you might not have a perfect edge at this point.

STEP 6: Annealing and Tempering
Every sword needs to be solid and tough to withstand blows and last longer. There is little or no use of your sword if it breaks easily. To ensure your swords are solid and rigid, you need to anneal them. Annealing the bronze or steel blade will make the edge withstand heavy blows.
- Place the blade in the forge and heat it to a high temperature.
- When the blade becomes red hot, please remove it from the forge and place it on a surface and expose it to the room temperature
- Allow the bronze or steel blade to cool down slowly. The heating and cooling of the blade are what make the edge tougher.
- Tempering adds flexibility to the blade and it comes after proper annealing
- Temper the blade, heat it to a fairly high temperature. Note that the temperature should not be as high as annealing.
- Quickly remove it from the forge and place it in a quenching liquid
- You have to be as fast as possible while placing it in the quenching liquid
- You can repeat the process thrice or more until you are satisfied with the outcome
STEP 7: Make Your Handle
Creating a sword is incomplete without a suitable handle. So, you have to make the handle for your Egyptian sword. The khopesh sickle sword can have a wooden, plastic, or ceramic handle attached to the bronze blade.
- To make the handle, you have to drill holes into the other end of the blade.
- Drilling the holes will allow you to fasten the wooden handles to your swords.
- Carefully place the handle and tighten it with the most suitable technique
- With the grip in place and your blade sharpened, you have your Egyptian sword ready.
During the ancient bronze age, people use wooden handles for their khopesh swords. You can also use wooden handles for your khopesh swords. Attach the handle to the blade through the drilled hole.
STEP 8: Style Your Blade
Your khopesh swords need to display your style and personality. You can ensure uniqueness by styling the blade of your sword. Styling requires you to beautify your khopesh sword by beveling characters or designs into the curved part of the blade.
In ancient Egypt, styling your khopesh sword makes it unique to you. You can replicate your preferred ancient-Egypt style to give your blade a unique appearance. You can also choose to use your designs to make your sword attractive and more visually appealing.
Use your angle grinder to bevel your design into the blade of your khopesh sword. You have to consider the length and curve of the blade while styling. The curved part of the blade will determine the template your design will follow, while the length will determine how long or extensive the design will be.
STEP 9: Finishing
The finishing is an essential step in the process of forging your khopesh sword. Blacksmiths in ancient Egypt make use of different methods to finish their khopesh sword. But these ancient-Egypt ways have become less significant in recent days.
Finishing is the last step in making your khopesh sword. It requires you to perfect the blade’s edges, smoothen the blade, and make it more classy and shiny. Use polishing wheels and finer grinds to polish and smoothen the blade.
Use a fine file and whetstone to sharpen the edge of your khopesh sword. With all these done, you have successfully forged your khopesh sword.

Frequently Asked Questions
Is the Khopesh a good weapon?
Khopesh is an excellent hacking weapon. It is a sickle sword that is useful in fighting ways. It is a good weapon used in ancient-Egypt wars. It helps break shields and attack limbs not protected by armor. Khopesh is a good weapon.
Why is a Khopesh curved?
The khopesh sword is an ancient weapon used in ancient Egypt. Its curved blade creates a point of balance, making it a perfect hacking weapon. The curved shape of the blade makes the khopesh sword cut better. The curved shape of the blade makes the blade perform several functions during wars, physical combat, and other activities.
What is the deadliest sword in history?
Several deadly swords in history are used in different wars, physical combats, and several other activities. One of the most lethal and sharpest swords in history is the Urumi. The Urumi is a type of sword that acts like a whip.
Another deadly sword is the katana. It is sharp on both edges and absolutely floppy, and it is used by ancient Indias for wars. The katana is also a fatal and short sword used by Japanese fighters, and the khopesh sword is also lethal. It is a sickle sword with sharp edges used by ancient warriors.
What were Khopesh used for?
The khopesh sword is one of the weapons used by ancient-Egypt warriors. The curved shape and sharp edge allow it to add more functionality to the sword. It helps get around shields during combat. It also performs an excellent job of puncturing different body parts like kidneys, intestines, and others.
The khopesh sword is one of the valuable weapons of war and combat used by different warriors. The blade does its job well, making it one of the most prominent weapons in Egypt. It is also one of the most powerful weapons of history.
Video: https://www.youtube.com/watch?v=IISOCxIbKuc
Warning and Precautions
Forging a weapon, particularly a Khopesh sword, requires proper care and due precautions. These precautions will not only help you to achieve desired results, but they will also ensure your safety and wellness all through the process. Some of the notable precautions and warnings while forging a Khopesh sword include;
- Assume every metal is hot to avoid burns.
- Use all necessary blacksmithing protective materials all through the process. Some of the notable protective materials include gloves, apron, protective glasses, and ear covers.
- Ensure that all tools and materials are in perfect condition before use.
- Only lay your hands on tools that you are familiar with, and you can operate.
- Avoid rubbing your hands on the edge of your sword after the first sharpening stage to avoid accidental cuts.
- Keep all forging precautionary measures in mind all through the process.
References
http://www.stormthecastle.com/Things/make-an-ancient-egyptian-sword-a-khopesh.htm
