Ever thought of adding armor craftsmanship to your cabinet of forging skills without stress? You can learn how to smith armor by following this guide. Armor craftsmanship is one of the most flexible aspects of blacksmithing procedures.
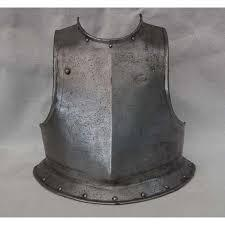
The entire body armor can be divided into four major parts. These parts are the helmet, the body, arm, and leg armor. Blacksmiths can forge an armor that would be suitable for the entire body.
However, one of the armor’s key features is the ability to protect such individuals against a wide variety of weapons without causing excess load on the body. It should be easy to move it around without stress.
You don’t have to be a professional before you can smith armor. All you need is the necessary blacksmithing skills, the right materials, and the proper steps to follow. Here some easy steps that would guide you through the forging process of armor.
Instructions on how to smith armor
Step 1: Get Your Materials
Getting you materials ready before you star will make the process a lot easier for you. The materials will determine the quality and final outcome of the process. This step is basic while learning how to smith armor.
You should have it in the back of your mind all through this process that you are trying to make a material that won’t be destructible by a standard weapon. Therefore, you should pay special attention to the material you would be using.
You should be making use of high carbon steel to produce a high hardening effect. Also, you should prepare your forge at a very high temperature while learning how to smith armor.
You can make use of a metal rod or other stock metals. Alternatively, you can make use of scrap metals as well. But you have to melt and beat them together to form a uniform shape.
Step 2: Create Your Design
Design is an abstract or template of what you want make. It will give you an overview of the entire project and help you to make accurate measurement. It makes how to smith armor relatively easy.
The design of your armor is dependent on what you want to create. The design of body armor is undoubtedly different from that of leg armor. But the types of armor all have one thing in common, the type of armor plate to use.
You can make a pictorial representation of what you intend to create or make a cardboard model to help you during cutting and joining. You should also make a precise measurement to help you in the right shape.

Step 3: Heating
Blacksmiths cannot work without heating the metal. This step is the most critical and arguably the most complicated in the blacksmithing process. This step has a significant impact on the end quality of your armor.
It is the determinant of how well the armor will serve its purpose. Heating will help you beat each part of the armor to shape.
Remember that you are using rod or other stock metals. It will require heating to craft out individual parts.
Heating is a normal part of blacksmithing and a crucial part of how to smith armor. Heating metal for making armor is not very different. The only difference you might want to consider is the heating temperature.
- Prepare your forge and add fuel. If you are using a coal forge, you must let it burn for a while to let the heat circulate through the forge.
- Let the forge set at the right temperature. Use suitable method to measure and ascertain the temperature of the forge.
- Heat the metal you intend to use to a workable temperature. Use appropriate methods to note the temperature. You can estimate he temperature from the metal’s color or use suitable equipment.
- Ensure that the heating lasts enough to make working on the metal easy for you.
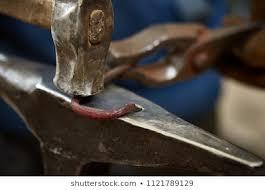
Step 4: Form The Armor Plate/ Hammering
Hammering is another critical step that can make or mar your project. However, there is a slight variation in the hammering process, depending on the nature of the material you are using.
In this case, you are forming something precise with your hammering. Hammering scrap metal is quite different from striking a metal rod. Nevertheless, hammering aims at one common endpoint.
To create a hard, flat, and utility plate that would be used for the rest of the process. The initial design you create can help you to know how to hammer each part.
- Get your metal out of the forge once it reaches a suitable temperature. Remember to handle hot metal with suitable tongs.
- Hammer down repeatedly until you have a resultant flat metal. Use flat head hammer or any hammer that can help you deliver powerful blows.
- Strike frequently and consistently while the metal is still hot. It is easier to beat metal to shape while it is hot. This explains why you must heat the metal to appropriate temperature before you star in the first place.
- Hammer at a precise angle to give you a uniform and leveled surface at the end.
- Continue hammering until you have your desired result. Re-heat the metal if there is a need to do it.
Step 5: Cutting
Now, we move to the technical part of the process. Before you proceed with the cutting, you must be sure of the design you want to create. Also, you must have done some measurements to help you rough-cut the material.
Use the cutting technique that best suits you. Feel free to cut the metal while it is still hot if you are confident that it won’t affect your measurement. You might also have made some precise cuts in the long run.
You will cut out each part distinctly. Note that measurement and shape of cut varies with designs. Don’t simulate other people’s measurement except you intend to create similar armor.
- Cut steel plate according to the pattern of armor you want to create. Consider some crucial parts such as the steel legs, steel arms, greaves, and helmets.
- Make curve edges at necessary points. For instance, give special consideration to the plates for parts like the ribs.
- Not all the parts require straight cuts. Consider the bending parts during cuts. Remember to cut out extra lengths for parts you need to join.
Step 6: Heating and Tempering
Heating and tempering have dual functions. It helps you harden your metal and increases its durability. Also, it will help you with some specific armor templates. For instance, it assists in making the curved edges of steel plates for the ribs and knee.
It will also make the armor metals suitable for its purpose. It will have enough tensile strength to protect the bearer of armor against strikes from other metals.
Step 7: Joining
Now, it’s time to join individual parts of the plate. Your initial design and simulation model should help in this process. Likewise, your precision during the cutting process and cutting accuracy is crucial for this process.
You should remember that there shouldn’t be any hole or spaces on a completed armor. Therefore, your joining should be tight.
- Weld the parts together and clean up the weld slag. You can also use alternative joining method where it is appropriate.
- You should remember the moveable pieces of the armor while joining. A good corset should be comfortable to wear and shouldn’t restrict movement.
Step 8: Polishing and Finishing
Once you complete the armor’s overall structure, then it’s time to improve the resulting outlook with a series of polishing. You can be flexible with the technique for polishing and finishing.
Finishing will improve the durability and appearance of your project. The finishing includes grinding and removing excess slag. Check out the final outcome and ensure that there are no lapses.
There are different types of finishing. Armor does not need a fancy finish. Instead, you should work on finishing that will improve the durability of the armor.
FAQs on How to Smith Armor
Question
Are there different types of armors?
Yes. There are different types of armors. These differences can either be defined by the body part it is protecting or the material it is made. You can have the helmet, leg armor, body armor, arm armor, greaves, breastplate, and so on.
Question
Can I use armor as a protective covering in the blacksmithing workshop?
No! Stick to the protective gears that are recommended for blacksmithing. Using steel armor will do more harm than good. Aside from the fact that it will not be comfortable, the steel can also get heat up during the process.
Question
Is it costly to forge armor?
Forging armor is not costly. It is even cheaper if you have scrap metals and won’t have to purchase metals.
Question
What Techniques do blacksmiths use in forging armor?
Blacksmiths use general techniques to smith armor. The entire process of developing armor revolves around four stages. These techniques include heating, hammering, shaping, and joining. The other strategy is the finishing stage, which is quite flexible depending on your projects’ nature.
Question
Do Blacksmiths use any measurement before forging armor?
Blacksmiths use general measurements to smith armor. However, they can take an individual’s specific size if they want to make custom armor. The essence of this measurement is to ensure that the armor is a perfect fit.
Question
How useful is body armor?
Ancient warriors use body armors to protect their bodies against physical attacks. But don’t make the mistake of thinking the use of armor is now obsolete. It is still useful for police officers and others that still need to protect themselves. Besides, it still serves as a treasure in art galleries.
Question
Is it illegal to use blacksmith armor?
It isn’t easy to generalize the legal state of armor usage because it is legal in some states, countries, or regions, but it is illegal in some others. It is best to understand the laws surrounding armor usage in your country.
Question
Can blacksmiths sell forged armors?
Of course, blacksmiths can sell their forged armor at fair rates. Most blacksmiths that forge armor aim to sell it.
Question
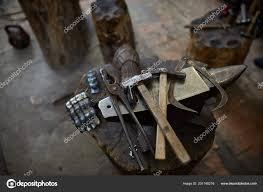
Do blacksmiths need tongs to forge armors?
Yes! Tongs play an essential role for blacksmiths in their quest of forging armors. It helps them to hold hot metals during this process.
Heating is an inevitable step in developing armors, and you cannot handle hot metals with bare hands. Therefore, the process might not be possible except with the use of tongs or similar tools.
Question
Can modern-day blacksmiths forge armors?
As long as a blacksmith have the required skill, he can forge armors. The techniques or process to smith armor are not primitive. So, both old and modern blacksmiths can forge armor.
Question
Do blacksmiths need protective gear for forging?
Blacksmiths need protective wear for all their tasks. The protective materials will keep them safe from potential hazards that come with this task. Some of the safety gears necessary and suitable for this process include gloves, safety boots, aprons, earplugs, and safety glasses.
Question
Are blacksmiths still crucial in society?
The relevance of blacksmiths in society is constant. Modern blacksmiths make a lot of essential materials, and they make some household materials like doorknobs, knives, plates, and so on. They also make fancy materials like decorative iron pieces and security metal buildups.
Question
Can a woman work as a blacksmith?
Of course! Blacksmiths are not gender-biased. So, women can also work as blacksmiths. However, some individuals argue that women might not be able to stand the rigor and heat of blacksmithing.
But history has proven this belief to be a wrong one. Women are involved in blacksmithing as early as the 1600s. The popularity of blacksmithing among women grew over time, and there are lots of women in the blacksmithing trade today.
Question
Is blacksmithing dangerous?
Like every other craft, blacksmithing also comes with its danger. But this doesn’t mean blacksmithing is dangerous in its totality. Some of the common hazards involved in blacksmithing are burns, physical and chemical injuries.
However, you can mitigate these potentials by using various blacksmithing protective materials.
Question
What are the other words for forge?
There are several synonyms for a forge: smithy, transcribe, duplicate, reproduce, fabricate, feign, imitate, frame, simulate, and produce.
However, these are just mere synonyms and might not give the right expression, particularly among professional blacksmiths. No one has ever complained about getting tired of using the word “forge,” you shouldn’t too.
Question
Is blacksmithing a profitable profession?
Blacksmithing is one of the best professions you can choose. Besides the fact that it is financially profitable, it is also flexible. It allows you to work with flexible work hours and express your creativity. The activities involved in blacksmithing will also help you to maintain proper physical fitness.
Question
Where to buy a blacksmith anvil?
You can buy anvils in various outlets that sell blacksmithing tools and materials. You will find small and large blacksmith anvil for sale in different local hardware stores around you. It is also possible to buy a blacksmith anvil at various online e-commerce sites like Amazon and eBay.
Some blacksmiths also make anvils for sale or sell used ones. The essential thing about where to buy blacksmith anvils is ensuring the source’s reliability and ascertaining the quality of the tool you are getting from them.
Question
How long does it take to SMITH armor?
Forging armor can be time-consuming, unlike some other blacksmith projects. The process starts with abstract design by getting materials, heating, cutting, shaping, and finishing, and this entire process can take up to 2-3 days.
But if you already have your materials and design ready, it will consume less time. You can finish the project in under 24 hours in this case.
Question
Can I SMITH armor with scrap metals?
Yes, you can forge a scrap metal armor as long as the metal material is suitable for the process.
Question
Can I SMITH armor without heating the metal?
Although cold forging is possible, it is not the same in high carbon steel used in forging armor. You cannot shape metals or bend them without heating them to a suitable temperature. Any attempt to develop armor without heating the metal is a waste of time, effort, and resources.
Question
Why does a blacksmith hit the anvil?
It is not advisable to hit the surface of your anvil with a hammer directly. However, if you find blacksmiths hitting the body of an anvil, it must have a definite reason.
One of the significant reasons’ blacksmiths hit the surface of an anvil is to keep the rhythm of their hammering strikes. Another reason is to find the perfect balance of the hammer while trying to make repeated strikes.
Question
What are the applications of forging?
The forging process has a lot of applications, and all of them are essential for blacksmithing processes. The application of forging includes;
- Machinery and equipment
- Defense equipment and weapon building
- Automobile industry
- Building hand and power tools
- Industrial tools
- Various home equipment
Video
Precautions
Ensure that you take the following precautions while forging armor:
- Do not proceed with the hammering process until the steel reaches the desired temperature.
- Hammer with precision to improve your outcome.
- Ensure that you use hand gloves and other safety gear all through the process.