Introduction
Are you keen on upgrading your blacksmithing expertise with some swordsmithing skills? How about learning how to forge a medieval weapon in a battle-ready medieval bastard sword? Swordsmithing is one of the essential skills of medieval blacksmiths. They make several types of medieval swords and other weapons.
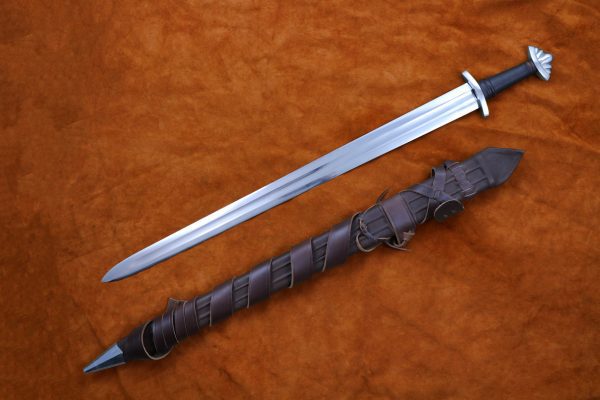
Bastard swords are one of the most common types of medieval swords, and the bastard sword is sometimes referred to as a long sword due to its size and shape. It is a long sword with an unusual blade length.
However, the bastard sword is slightly shorter than any other longsword with a rounded tip and many undefined traits. The medieval bastard sword stands distinct among different types, and it is an excellent way to improve your blacksmithing skill.
Forging a bastard sword requires different types of steel and basic blacksmithing techniques. This guide provides a stepwise guide to develop a medieval bastard sword without any hassle. All you need are the essential tools and basic blacksmithing skills.
Essentials
Planning your project before you start will make it a lot easier for you. This proper planning includes getting the essential materials that are vital for the process. Some of the essentials for forging medieval bastard swords include;
- Tongs
- Anvil
- Hammer
- Vice
- Forge
- Damascus or high carbon steel
- Drifts
- Chisels
- Punch
- Sandpaper
- Quenching oil in a bucket
- Belt Sander
STEP 1: Gather Your Materials
The first step to having a successful project is gathering your materials. Forging the medieval bastard sword can be more stressful than you think without the proper materials. All you need to do is get the essentials above and other basic blacksmithing requirements.
Your protective and safety materials should also come in handy before starting your sword-making process. Once you tick every essential requirement on the list, you can proceed to the next step.
STEP 2: Design Your medieval bastard Sword
After gathering your materials, crafting a design for your medieval bastard sword is another vital step. There are several types of bastard swords. If it is your first time forging a weapon or having limited experience, it is best to start with a simple design to master the fundamentals.
If you have a hard time designing your weapon, you can research some from the middle ages and pick inspiration from them. If you have limited experience designing a sword, you can draw out the design on paper.
It is essential to keep the crucial features of a medieval bastard sword in mind. Consider the blade length and the overall shape when making your sword design.
STEP 3: Measure and Cut
One of the things you should keep in mind when designing your medieval bastard sword is the measurement of the blade and handle. Once you have the correct size, take it out to your stock steel and mark it out.
It is not a good idea to mark out the exact length you want in your blade. It is best to add extra measurements to accommodate all slags and possible mistakes during forging and hammering.

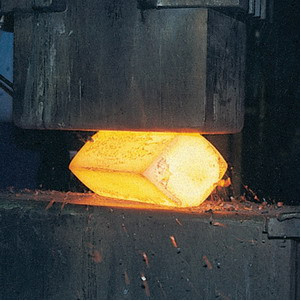
STEP 4: Heating
Heating is an essential step in sword making process. For medieval bastard swords, the heating usually takes place at a very high temperature. Start by preparing your forge and fire it up to a level hot enough to forge a weapon.
- Grip your stock steel with a pair of tongs and insert it in the forge.
- Please leave it in the forge until it reaches a temperature of about 2,100 to 2,200 degrees Fahrenheit.
Note that there are several ways to read the steel temperature when it is inside the forge. In this case, you can watch out for the color change. Leave the steel in the forge until it turns yellow. Once it attains this color, you can be sure that it is ready for further action.
- Use your tong to remove the steel from the forge and place it on the anvil for some hammering.
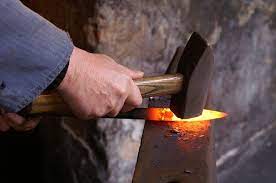
STEP 5: Shape The Steel
Creating medieval swords has a lot to do with their shape. If you ignore the shape and length at this point, you might just be making a weapon that is not a bastard sword. The hammering process will also determine the width and other dimensions of the bastard sword.
- Once the sock steel reaches the desired temperature, remove it with the tong and place it gently on the anvil.
- Hammer the steel down until it forms the shape of a bastard sword. Keep in mind that hammering a medieval sword requires more technique than power.
- Reheat the blade as many times as needed until you achieve the desired shape.
- It is not compulsory to achieve the perfect shape of the medieval bastard sword at this point. But ensure that you have a clear look-alike of what you intend to create.
STEP 6: Flatten The Sword Blade
One of the features that distinguish bastard swords from other medieval swords is the flatness of the blade. Hence, you need to pay close attention to the technique at this stage.
- Start by tapering both sides of the blade evenly.
- Create a cutting edge on either side of the sword by using your hammer to bevel both sides of the blade.
- Of course, you can only hammer one side of the sword at a time. So, hammer one side of the blade until it is even before flipping it to the other side.
- Repeat the hammering on the other side until you have a uniform flatness on both sides of the blade.
STEP 7: Heat and Cool The Sword (Annealing)
Annealing is an essential step regardless of the type of weapon or sword you intend to create. It is particularly critical with bastard swords and most other medieval swords because it enhances its functionality.
Annealing helps to soften the blade after all the heating process and hammering. It prevents it from breaking off or shattering during other processing steps. The entire process requires you to heat the blade until it loses its magnetism before allowing it to cool as slowly as possible.
- Normalize the blade by reheating it till it losses its magnetism.
- The non-magnetic temperature is usually around 1400 degrees Fahrenheit.
- Allow the edge to cool off slowly at room temperature until the red color leaves the steel.
- Once the red color leaves the edge, place it back into the forge and reheat to the initial temperature.
- Repeat the process at least thrice.
Note: The annealing process of bastard swords can take time, sometimes the whole day. Allow the blade to cool as slowly as possible. Do not try to hasten the cooling process of the sword by any means.
STEP 8: Sanding and Grinding
Sanding and grinding are essential for smoothening out all edges of the sword. You can do this with a belt grinder or by hand.
- If you have a 6” belt sander, start with it, as it will do most of the work for you.
- Next, use a 1” belt sander to file the edges.
- Use a sander to remove all the slags on the surface of the sword
Note: The process might require a couple of hours because you have to be careful. Excessive grinding of the sword can alter the shape and size of the blade. However, the grinding should be sufficient enough to give you an almost perfect sharpening.
STEP 9: Hardening
Strenght is one of the critical features of medieval swords, particularly medieval bastard swords. This process is also regarded as heat treatment. Remember, the annealing process softens the blade, and now it is time to improve the strength.
- Heat the sword to the point of austenitization.
- Quickly move it from the forge to the quenching bucket and leave it till it returns to room temperature.
- Repeat the process at least three times to give the blade the necessary strength of a medieval bastard sword. This process is sometimes called quenching, and it aims at increasing the resilience of the bastard sword without compromising its flexibility.
Note: The process of removing the sword from the forge to the quenching oil should be done as quickly as possible. Being slow allows the blade to start cooling at room temperature, preventing it from hardening properly when it gets to the quenching oil.
STEP 10: Sharpen the Blade
Now it’s time to improve the edges of the blade once you are done enhancing its strength. Feel free to use any suitable method to make the blade as sharp as possible. Note that this is not the final sharpening process. So, don’t push yourself too hard to achieve the final results.
STEP 11: Tempering
Tempering allows you to get rid of the brittleness induced by the hardening process. It relaxes the stress and makes it more flexible, an essential feature of a medieval bastard sword. Tempering will prevent your bastard sword from breaking off when it strikes another object.
- Heat the sword gently to a reasonably high temperature. Note that the temperature is not as high as in the hardening process. It is best to pay attention to the color change of your sword at this point.
- Remove the sword from the forge once the centerline attains a plum color and the edge has a wheat color.
- Allow the sword to cool slowly.
- Use sandpaper or Emory paper to clean the surface of the sword to keep it shining and smooth.
STEP 12: Create The Hilt
The hilt of a medial bastard sword is also referred to as the handle in the regular tongue. Several materials are suitable for creating the handle of your sword. You can use leather, wood, rubber, or even wire.
The handle makes it easy to hold and handle the sword. So, it is vital to make it as comfortable as possible. Creating the handle for your sword is quite flexible; you can integrate your creativity to build the most comfortable grip.
Don’t forget to include a pommel in the handle of your medieval bastard sword. A pommel is a large fitting at the top of the handle that prevents the sword from slipping off your hand. It is usually made of metal and also ensures properly weighted equilibrium when handling the sword.
step 13: Finishing and Polishing
Finishing and polishing is the final step when creating your bastard sword. This process ensures that your weapon is durable, classy, and visually appealing. This step will also perfect the edge of your blade and give them a polished look.
You can use a whetstone and a fine file to sharpen the edge of your medieval bastard sword. You can also use finer grinds and a polishing wheel to make the sword shinier.
Viola! You have successfully created your medieval bastard sword. Following the steps above will make the entire process almost entirely hassle-free for you.
Frequently Asked Questions
Are bastard swords real?
Bastard swords are real, and they are one of the most common types of swords in the middle ages. This weapon falls within the range of long swords and broad swords, and they are also similar to two-handed greatswords in size. Summarily, bastard swords are accurate and are prevalent in the middle ages.
What is the difference between a longsword and a bastard sword?
The difference between bastard swords and long swords is not pronounced in most parts. The major difference between the two is the handling of the blade. A bastard sword usually has the same length as a single-hand sword, but the grip is generally long enough to make it two-handed. The entire design of the long sword is to be a complete killing weapon.
A longsword, on the other hand, is a complete two-handed sword. The blade of a long sword is slightly longer than that of a bastard sword, making it entirely a two-handed sword.
Why is a longsword called a bastard sword?
A longsword and a bastard sword are often called interchangeably because they are similar in many regards. They are both medieval swords and historical weapons, and they have identical lengths. So, most people find it challenging to differentiate between the two, resulting in calling them the same name.
What were bastard swords used for?
A bastard sword is primarily designed as a killing tool. It is helpful for cutting, thrusting, and other fearsome capabilities on the battlefield. A bastard sword is a close compact weapon capable of delivering a deadly blow. This weapon has features and strengths that make it effective when attacking plate armor.
Video: https://www.youtube.com/watch?v=S8X-l0nFy-E
Warning and Precautions
Forging a weapon, particularly a bastard sword, requires proper care and due precautions. These precautions will not only help you to achieve desired results, but they will also ensure your safety and wellness all through the process. Some of the notable precautions and warnings while forging a bastard sword include;
- Assume every metal is hot and handle with care to avoid burn.
- Use all necessary blacksmithing protective materials all through the process. Some of the notable protective materials include gloves, apron, protective glasses, and ear covers.
- Ensure that all tools and materials are in perfect condition before use.
- Only lay your hands on tools that you are familiar with, and you can operate.
- Avoid rubbing your hands on the edge of your sword after the first sharpening stage to avoid accidental cuts.
- Keep all forging precautionary measures in mind all through the process to ensure safety.
References
http://www.stormthecastle.com/swords/battle-ready-swords.htm
